
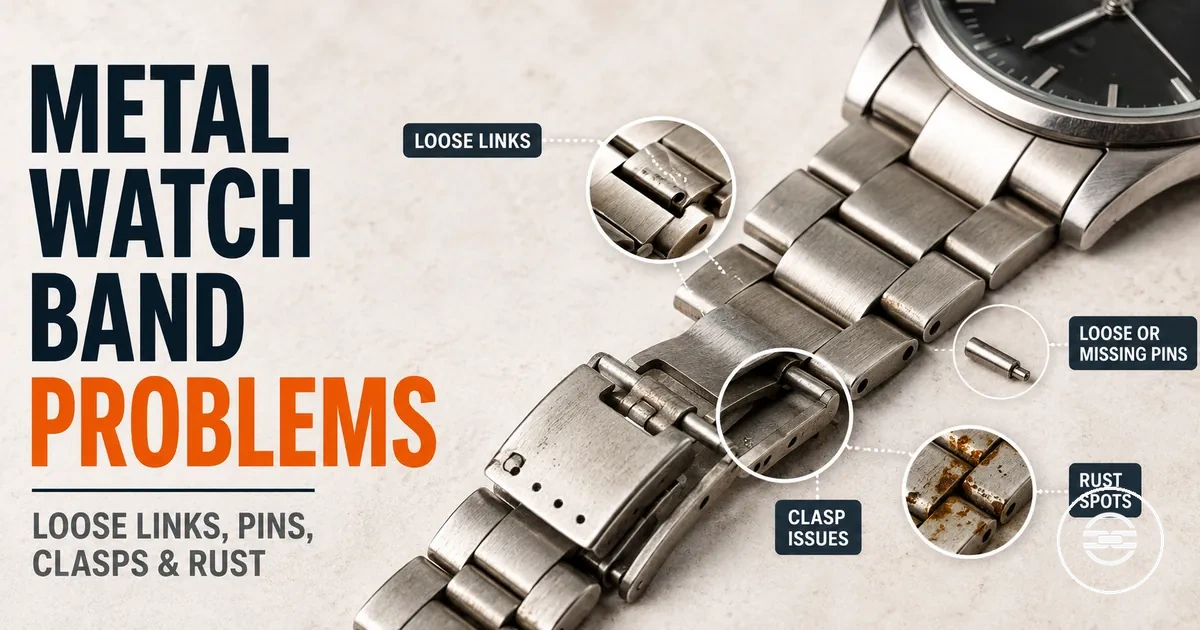
Metal Watch Band Problems and Troubleshooting
When a metal watch band becomes loose, rattles, develops rust, or has a weak clasp, the problem is usually related to fit, part wear, moisture, or alignment. Loose links can result from moving pins or worn collars, while a weak clasp may increase the risk of the watch coming loose. Rust or corrosion can also affect the condition of links, spring bars, and the closure over time.
Troubleshooting metal watch bands means identifying which connected part is causing the symptom before deciding on a safe solution. The band, links, pins, collars, spring bars, clasp, end links, and surface finish all influence whether the issue is more likely to need cleaning, adjustment, repair, or replacement. Start by matching the visible symptom to the part that appears affected.
Most metal watch band problems can be diagnosed by connecting symptoms with likely causes rather than assuming every issue has the same solution. Rattling or link movement may indicate worn retention parts or an incorrect fit, while a clasp that does not lock securely may be affected by wear or alignment. Surface rust or staining may only require cleaning in some cases, but deeper corrosion or damaged parts can make replacement the safer option.
| Symptom | Likely cause or area to inspect | Safe next step |
|---|---|---|
| Loose links or rattling | Pins, collars, link joints, or bracelet fit | Check for movement and determine whether adjustment or repair is appropriate. |
| Weak or opening clasp | Clasp lock or alignment | Inspect the locking mechanism and consider replacement if it no longer secures properly. |
| Watch shifts excessively on the wrist | Fit, spring bars, or end links | Inspect for visible gaps or movement before deciding on adjustment or part replacement. |
| Rust, stains, or corrosion | Moisture around links, pins, or clasp | Clean light surface corrosion and inspect for structural damage before continued use. |
Repair may be suitable when the affected component remains structurally sound. If corrosion has weakened the metal or a pin, spring bar, or clasp no longer retains the band securely, replacement may provide the safer solution.
Metal Watch Band Symptoms That Identify the Problem
When a metal watch band shows a symptom such as a loose fit, rattling, a weak clasp, or rust, match the sign to the part showing movement, noise, failed closure, or corrosion. Different symptoms may point to different conditions. The affected part and its condition determine the next check.
Metal Watch Band Symptoms That Identify the Problem are easier to assess when each symptom is organised by part and risk. The image below labels common symptom locations on the band. When symptoms overlap, treat them as possible combined causes rather than assuming one condition explains everything.
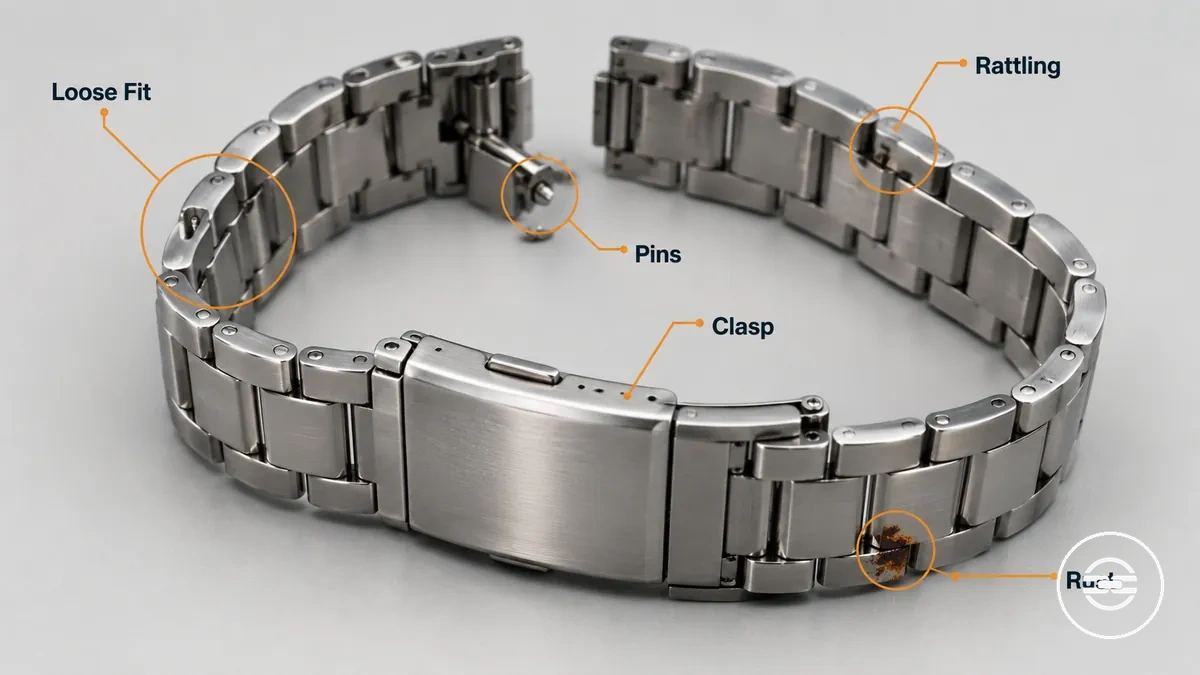
- Loose fit: The band shifts on the wrist more than expected. Likely part: bracelet sizing or link fit. Next check: Look for excess bracelet movement before assuming part wear.
- Rattling: Bracelet noise or link movement appears during wear. Likely part: links, pins, or end links. Next check: Check for movement around the retention points.
- Pins or spring bars moving: A pin appears to back out or a spring bar does not remain fully seated. Likely part: retention components. Next check: Inspect whether the part is secure before continued use.
- Clasp will not stay closed: The closure opens or feels insecure. Likely part: clasp lock or alignment. Next check: Check for visible wear or misalignment that may increase drop risk.
- Rust or stain: Discolouration appears on the metal watch band. Likely part: moisture-exposed links, pins, or clasp. Next check: Inspect whether the change is limited to the surface or may indicate deeper corrosion.
- Overlapping symptoms: A loose fit with rattling, or rust with a closure issue, may involve more than one condition. Next check: Assess each symptom separately before choosing a repair path.
Loose Fit, Sliding, or Uneven Wrist Position
A loose fit can cause a metal watch band to slide, shift, or sit unevenly on the wrist, which may indicate a sizing or bracelet balance issue rather than damage. Wrist position can change as the bracelet moves during normal wear. Loose Fit, Sliding, or Uneven Wrist Position is shown below to clarify how a visible gap and off-centre placement can appear on the wrist.
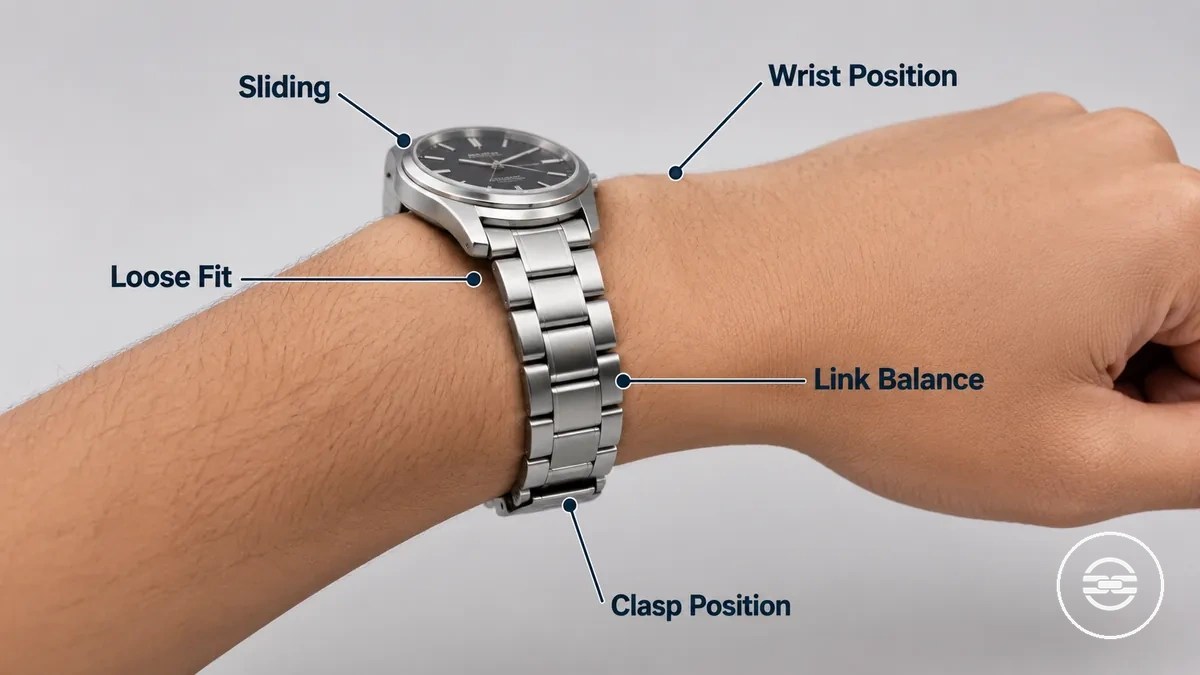
Use this checklist to verify loose fit through wrist movement, link balance, and clasp position. The link count, bracelet balance, and available micro-adjustment may affect where the watch sits and whether pressure points develop, but this fit diagnosis is separate from carrying out a full resizing procedure.
- Wrist position: Check whether the watch repeatedly slides away from its usual position during normal movement.
- Link count: Consider whether the bracelet appears longer than needed without assuming how many links should be removed.
- Bracelet balance: Look for uneven link distribution that may pull the watch off-centre.
- Clasp position: Check whether the clasp sits noticeably away from the underside centre of the wrist.
- Micro-adjustment and pressure points: Check whether an available micro-adjustment may reduce movement or uneven pressure, depending on the band design and condition.
Loose Links, Rattling End Links, or Bracelet Noise
When loose links, rattling end links, or bracelet noise occur as the wrist moves, the sound usually indicates movement between metal parts rather than one confirmed fault. Loose Links, Rattling End Links, or Bracelet Noise is shown below to highlight where mechanical play creates sound and where the movement may require closer inspection.
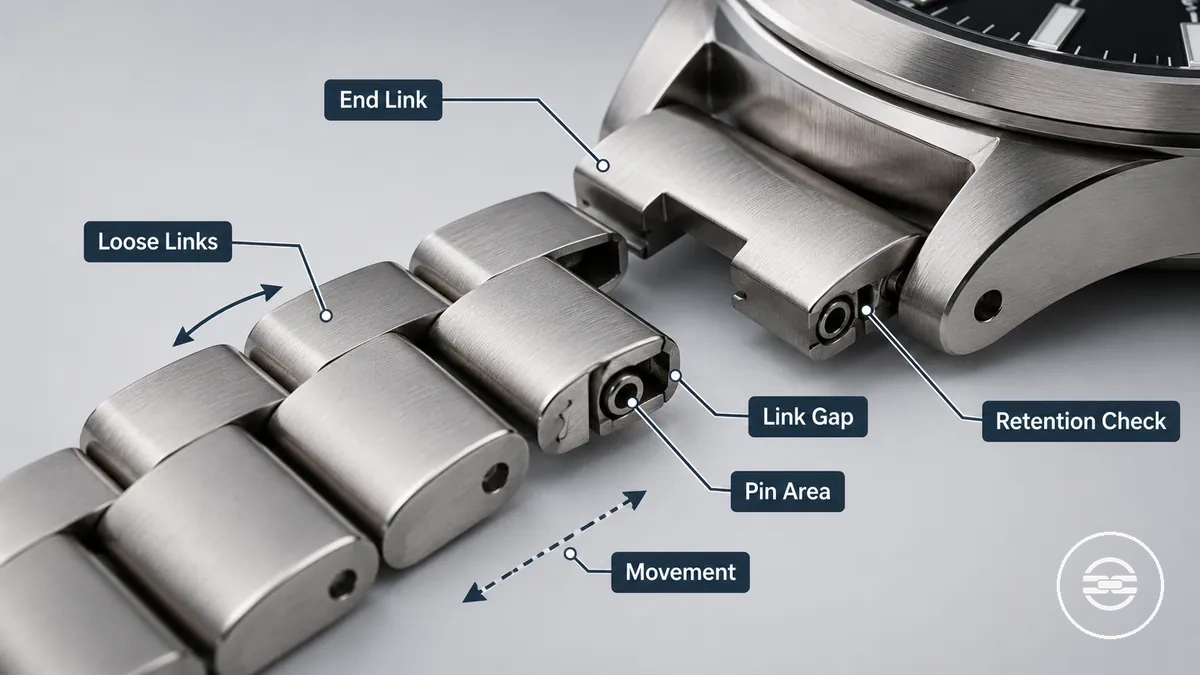
Use these checks to identify where bracelet noise begins and how the movement relates to the affected part. Minor link play can produce light bracelet rattle without affecting retention, while larger gaps or movement around pins, collars, or end links may increase the risk of reduced retention depending on the part condition.
- Link joints: Check for movement between adjacent links. Light link play may create bracelet noise, while increasing movement can indicate wear.
- End links: Inspect where the end links meet the watch case. A visible gap with repeated rattling may suggest movement at this connection.
- Pins and collars: Look for shifting pins or collars. Movement in these retention parts may contribute to rattling and should be checked if retention appears affected.
- Bracelet tension: Gently move the bracelet to locate where the sound starts. Noise with only minor play can differ from movement that may threaten secure retention.
Pins, Spring Bars, or Collars That Move Out
When pins, spring bars, or collars move out of position, the bracelet or watch head can lose retention and may separate from the wrist. This condition creates a higher-risk problem because the retaining parts are no longer fully seated. If movement is visible, continued wear may increase the risk of the watch coming loose depending on the part condition.
Use this checklist to verify that the retention parts remain seated and appear appropriately sized before wearing the watch again. If any retaining part continues to move out after inspection, stop using the watch until the cause is corrected instead of continuing to wear it.
- Pin direction: Check whether pins are backing out or sliding out instead of remaining fully seated.
- Collar presence: Look for missing collars or signs that a retaining part is no longer holding the pin securely.
- Spring bar compression: Check whether the spring bars compress, return normally, and remain fully engaged with the lugs.
- Lug engagement and part size: Confirm secure lug engagement and look for wrong-size parts or missing parts that may reduce retention.
Clasps That Will Not Lock or Stay Closed
When a clasp will not lock or stay closed, clasp failure is usually related to weak tension, alignment, an obstruction inside the mechanism, or hinge wear rather than a single cause. A push button, fold-over lock, or safety catch may fail to close securely if the parts do not align correctly or the retaining surfaces have worn. The condition and clasp design influence whether the problem is temporary or a sign of reduced closure security.
Clasps That Will Not Lock or Stay Closed can often be assessed by distinguishing temporary stiffness from worn closure security. The comparison below separates these common patterns. If the clasp still does not stay closed after a basic inspection, the watch may have an increased drop risk and should not be worn until the cause is corrected.
| Symptom | What it may indicate |
|---|---|
| Clasp feels stiff or difficult to close | Dirt or debris may be restricting movement rather than indicating weak tension. |
| Push button or fold-over lock closes but will not stay closed | Weak tension, hinge wear, or reduced locking engagement may be affecting the mechanism. |
| Safety catch does not align properly | Misalignment may prevent the clasp from locking securely. |
| Closure opens during normal wrist movement | The clasp may no longer provide reliable retention, increasing the risk of the watch being released from the wrist. |
Rust, Stains, or Corrosion on the Band
Rust, stains, or corrosion on the band can range from cosmetic surface marks to deeper deterioration, depending on depth, spread, and location. Small areas of surface rust or stainless steel discoloration may be limited to the finish, while pitting or corrosion around pins, links, or the clasp area may indicate a more serious condition.
Moisture exposure, trapped residue, or coating damage may contribute to orange spots, staining, and corrosion spots, but appearance alone does not confirm how deeply the metal is affected. The checklist below organizes rust, stains, and corrosion by visible depth and spread; light surface marks may be suitable for cautious cleaning when the material and finish allow it, while spreading pitting or weakened connection areas may require replacement-level assessment.
- Surface staining: Flat discoloration without visible texture change may be a cosmetic surface mark rather than deeper corrosion.
- Surface rust: Isolated orange spots may indicate local moisture exposure, especially where moisture or residue can collect.
- Coating damage: Discoloration around scratches, chips, or worn finishes may show that the underlying metal is more exposed.
- Pitting: Small cavities or a rough, uneven surface may indicate deeper corrosion rather than removable staining.
- Spread and location: Corrosion extending across links or appearing near pins and the clasp area may create greater structural concern than a limited mark on an open surface.
Likely Causes Behind Metal Watch Band Failures
Metal watch band failures become easier to diagnose when visible symptoms are linked to their likely causes instead of being treated as isolated problems. Wear, fit, dirt buildup, moisture, misalignment, wrong-size parts, and bent components can contribute individually or together, so a single symptom may reflect more than one contributing factor.
Likely Causes Behind Metal Watch Band Failures are best understood by comparing the symptom with the probable condition rather than assuming one root cause. The table below connects common failure patterns with what to inspect and the potential risk if the condition is ignored.
| Symptom | Likely cause | What to check | Risk if ignored |
|---|---|---|---|
| Loose movement or rattling | Wear or poor fit | Link wear, pin condition, and overall sizing | Increasing movement and reduced stability |
| Pin or spring bar movement | Wrong-size parts or misalignment | Part seating, retention, and alignment | Reduced bracelet retention |
| Stiff links or unreliable clasp movement | Dirt buildup, sweat, moisture, or bent components | Moving joints, hinges, and visible contamination | Restricted movement or unreliable closure |
| Rust, stains, or corrosion | Moisture exposure with surface deterioration | Corrosion depth, spread, and affected areas | Progressive weakening if corrosion continues |
For example, excessive movement may result from both poor fit and accumulated wear rather than either condition alone. When multiple failure patterns appear together, assessing each contributing factor usually provides a clearer basis for selecting an appropriate maintenance or repair approach.
Incorrect Sizing or Uneven Link Adjustment
Incorrect sizing or uneven link adjustment can change bracelet balance and cause looseness, sliding, pressure, or rattling. Fit may also vary with wrist position, wrist swelling, link count, micro-adjustment, and clasp position, so the symptom may reflect more than one sizing condition.
The checklist below verifies sizing and bracelet balance without replacing a full adjustment process. Removing too many links, for example, may reduce sliding but create pressure or move the clasp away from a balanced wrist position. For complete resizing steps, see how to adjust a metal watch band.
- Link count: Check whether the number and distribution of links create an uneven fit between both sides of the bracelet.
- Micro-adjustment: Check whether the available setting suits normal wrist movement and changes in wrist swelling.
- Clasp position: A clasp that sits noticeably off-centre may indicate uneven link adjustment or link imbalance.
- Movement and pressure: Sliding, rattling, or concentrated pressure may show that bracelet balance needs review rather than a single local change.
Worn, Bent, Missing, or Wrong-Size Parts
Worn, bent, missing, or wrong-size parts can reduce the reliability of a metal watch band even when the rest of the band appears serviceable. Cosmetic wear, such as light surface marks on links, may have little effect on retention, while worn parts, bent parts, missing parts, or wrong-size parts affecting pins, collars, spring bars, clasp blades, or screws may reduce security or change how reliably the band stays attached or closed.
Worn, Bent, Missing, or Wrong-Size Parts are easier to assess when each component is considered alongside its condition and potential reliability risk. The table below organizes part condition by reliability risk; repairability and interchangeability depend on the specific watch model and component dimensions rather than assuming one part is suitable for every band.
| Entity/part | Condition | Effect/risk | Decision cue |
|---|---|---|---|
| Pins and collars | Worn, missing, or wrong-size parts | Reduced link retention or unwanted movement | Check for looseness, shifting, or incomplete seating |
| Spring bars | Bent or worn component | Less reliable lug engagement | Inspect for secure engagement at both ends |
| Links and end links | Wear, bending, or incorrect part | Extra movement, noise, or uneven fit | Compare alignment and connection points |
| Clasp blades and screws | Bent, worn, or loose | Reduced closure security | Check whether the clasp closes, locks, and remains secure during normal use |
Dirt, Sweat, Moisture, and Surface Damage
Dirt, sweat, moisture, and surface damage can contribute to stiffness, staining, rust, odour, or clasp resistance when residue or trapped moisture collects around moving areas. The effect depends on the band material, surface condition, corrosion depth, and whether debris remains on the surface or inside link joints. Sweat salts and trapped moisture may increase maintenance concerns, particularly where drying is incomplete or coating damage is present.
The checklist below connects dirt, sweat, moisture, and surface damage to common maintenance symptoms. Surface buildup may respond to appropriate maintenance, while deep corrosion, deformed components, or damaged retention points may require structural assessment rather than cleaning alone.
- Dirt and debris: Buildup inside link joints may restrict movement or create stiffness and noise.
- Sweat and moisture: Sweat salts, residue, and trapped moisture may contribute to staining, rust, or odour, depending on the metal and finish.
- Finish scratches and coating damage: Light finish scratches may be cosmetic, while coating damage can leave exposed areas more susceptible to local corrosion.
- Clasp resistance: Grime around hinges or contact points may increase clasp resistance, although bent or worn components can produce similar symptoms.
- Drying conditions: Incomplete drying may leave moisture in link joints or beneath the clasp, allowing buildup and corrosion-related symptoms to persist.
Misaligned Clasp Blades, End Links, or Spring Bars
Misaligned clasp blades, end links, or spring bars can reduce closure security or create an unstable attachment even when no component appears damaged. Alignment affects load distribution across the clasp, hinge line, and attachment points, so a part that is slightly shifted, off-center, or not seated correctly may lead to unreliable closure, lateral movement, or noise. For example, a spring bar that appears fully installed but is not seated in both lug holes can reduce attachment security.
The checklist below verifies alignment points that affect closure and attachment. If more than one alignment point is misaligned, the band may remain unstable and should be assessed further before continued use.
- Clasp blades: Check whether the clasp blades have even seating and close without appearing off-center.
- Hinge line: Look for a shifted hinge line or uneven closure that may indicate misalignment.
- End links: Confirm that the end links fit evenly against the case without excessive lateral movement or persistent noise.
- Spring bars: Verify that both spring bars are fully seated in the lug holes and do not show visible movement.
Fixes for Loose Fit, Links, and Rattling
Fixes for loose fit, loose links, and rattling depend on the diagnosed condition rather than a single repair method. If the issue is loose fit, a micro-adjustment or improved link balance may help tighten fit, while movement from loose links or end links should be checked separately before making further changes.
The numbered steps below provide a limited fix path for Fixes for Loose Fit, Links, and Rattling based on the diagnosed symptom.
- Identify the noise location: If rattling comes from the clasp, loose links, or end links, isolate the source before making adjustments. Stop if the movement cannot be traced or becomes worse during inspection.
- Address loose fit: If the band feels secure but moves excessively on the wrist, use an available micro-adjustment to reduce movement and improve comfort. Stop if the clasp resists adjustment or appears bent.
- Check link balance and loose collars: If the clasp sits unevenly or one side carries more links, review link balance and inspect loose collars or pins for incomplete seating. Stop if a collar is missing, damaged, or cannot be seated securely.
- Assess end links: If movement or rattling is concentrated where the band meets the watch case, check whether the end links remain stable during normal movement. Stop if attachment becomes less secure or instability increases.
- Recheck stability: If movement has been reduced without introducing resistance, confirm that the band closes normally and remains stable during regular wear. Stop if bending, worsening movement, or uncertainty remains.
Stop cues include resistance, bending, worsening movement, or uncertainty about the condition of the band. If those conditions remain after these checks, further adjustment may not be appropriate, particularly when worn or damaged components could be affecting stability.
Tightening the Fit Without Over-Adjusting
Tighten a metal watch band only enough to reduce sliding while maintaining comfort. If the fit issue can be corrected with micro-adjustment holes, that option may preserve better link balance than changing removable links, while the clasp position should still allow for normal wrist expansion and comfortable movement. A snug fit should reduce sliding without creating constant pressure or removing normal comfort gaps.
The steps below help tighten fit without over-adjusting.
- Check micro-adjustment holes: If available, make a small adjustment and perform a fit check to confirm reduced sliding without added pressure.
- Review removable links: If further tightening is needed, consider removable links while maintaining balanced link distribution. Stop if removing another link would make the band feel restrictive.
- Confirm clasp position: Check that the clasp position remains centred and comfortable, allowing for normal wrist expansion and small comfort gaps during daily wear.
- Reassess the fit: If the fit cannot be stabilized without excessive pressure or continued sliding, further adjustment may not be appropriate and replacement of worn components may be a better decision when adjustment alone cannot resolve the unstable fit.
Securing Loose Links, Collars, and End Links
Loose links, collars, and end links should be secured only when the movement is local rather than caused by an overall fit issue. If movement is limited to a single connection point, a retention check may help re-seat the affected components and improve pin stability without changing the band size. If the same connection repeatedly becomes loose, worn components may be contributing to the problem instead of simple misalignment.
Use the checks below as a retention check for securing loose links, collars, and end links.
- Link direction: Confirm that the link direction matches the intended pin orientation before attempting to secure the connection.
- Collar placement: Check that collar placement is correct, then re-seat the collar fully and confirm pin stability.
- End-link seating: Verify that end-link seating is even and that the end links do not show unnecessary movement against the watch case.
- Pin stability: Apply only controlled pressure when confirming that the pin is fully seated, and stop if resistance or instability increases.
- Repeated looseness: If the same loose links, collars, or end links continue to loosen after careful re-seating, worn components may require further assessment rather than repeated securing.
Fixes for Pins, Spring Bars, and Clasp Problems
Fixes for pins, spring bars, and clasp problems should be attempted only after the affected retention parts have been checked carefully before the watch is worn again. The appropriate action depends on whether the issue involves incomplete seating, reduced clasp tension, or damaged parts that should not be re-seated. Each retention point should be verified before the band is relied on during normal wear.
Each mini-procedure below verifies a different retention point.
- Pins: Check pin seating and any related collars for correct alignment. If a pin is not fully seated, carefully re-seat it and confirm that it remains stable before wearing the watch.
- Spring bars: Confirm spring bar engagement by checking that both ends are seated in the lug holes. Perform a gentle tug test to verify engagement, and stop if a spring bar appears bent, loose, missing, or uncertain.
- Clasp problems: Check clasp tension, the safety catch if present, and the closure for secure operation. If a clasp component is visibly damaged, replace only the affected clasp part when its compatibility is confirmed, then complete post-fix testing by opening, closing, and lightly checking for unintended movement.
Stop if damaged parts, bent components, missing retention parts, or uncertain fit prevent reliable verification. If re-seating does not restore secure retention or repair confidence remains low, stop further adjustment and seek professional repair.
Re-Seating Pins and Spring Bars Correctly
Re-seating pins and spring bars is appropriate only when the parts are present, straight, correctly sized, and still able to hold tension. If a pin, collar, or spring bar is damaged, bent, missing, or no longer retains securely, re-seating should stop because reliable retention may not be restored.
Re-seating pins and spring bars correctly depends on fit, tension, and complete seating.
- Confirm pin direction: Verify the correct pin direction before reinserting the pin so it can seat correctly with proper collar support.
- Check collar support: Ensure collar support is aligned and remains in place before completing pin seating.
- Verify spring bar compression: Compress the spring bar only enough to position it between the lugs while keeping both ends aligned for proper lug hole engagement.
- Confirm engagement: Check that both spring bar ends are fully seated in the lug holes before releasing compression.
- Complete tug testing: Perform light tug testing as a final retention check. If repeated movement continues after re-seating, replacement or professional repair may be needed.
Restoring Clasp Tension or Replacing Damaged Clasp Parts
Clasp tension can sometimes be restored when the problem is limited to alignment, light obstruction, or minor loss of closure tension rather than broken components. Clasp action depends on clasp tension, alignment, and part condition, so damaged clasp parts, hinge wear, or failed locking components usually require clasp replacement instead of repeated adjustment.
The checklist below separates restoring clasp tension, cleaning obstruction, and deciding when damaged clasp parts require replacement.
- Fold-over tension: If fold-over tension feels weak but the clasp is structurally sound, check alignment and confirm the closure still provides adequate closure security after closing.
- Push-button action: If the push-button action feels stiff, inspect for dirt that may be restricting movement. In contrast, if the button moves normally but closure security remains weak, hinge wear or internal damage may be contributing to the problem.
- Safety lock: Verify that the safety lock engages and releases correctly. If it no longer locks reliably because of damaged clasp parts, clasp replacement is usually the safer decision.
- Replacement cue: Restore clasp tension only when the clasp remains structurally sound. If broken components, excessive hinge wear, or repeated closure failure are present, choose clasp replacement rather than continued adjustment.
If clasp design differences affect the repair decision, see metal watch band clasp types for clarification rather than assuming every clasp uses the same repair method.
Rust and Corrosion Troubleshooting
Rust and corrosion troubleshooting depends on the depth, spread, and location of the damage rather than surface colour alone. Surface staining or stainless steel discoloration may require only cleaning and monitoring, while rust near pins, links, or clasp parts can present a greater retention risk when corrosion is deeper or more widespread.
The severity table organises rust and corrosion by depth, spread, and location to separate cleanable surface issues from damage that may require repair or replacement.
| Mark or damage | Likely condition | Safe first response | Replacement signal |
|---|---|---|---|
| Surface staining or stainless steel discoloration | Light surface marks with no visible pitting | Cleaning followed by monitoring | Discoloration spreads or develops visible corrosion |
| Small rust spots | Localised corrosion spots | Clean the affected area and monitor for further spread | Rust returns, spreads, or extends beneath the surface |
| Pitting near pins, links, or clasp parts | Deeper corrosion that may affect structural integrity | Inspect carefully and prevent further trapped moisture | Visible pitting affects retention components or continues to spread |
| Corrosion around clasp parts with trapped moisture | Moisture-related corrosion affecting moving components | Dry, inspect, and monitor after cleaning | Replacement may be needed if corrosion reduces reliable operation |
Choose cleaning for surface staining, monitor isolated discoloration that remains stable, and consider repair or replacement when rust, pitting, or corrosion affects structural areas or moving retention parts. For routine methods to clean metal watch bands, use the dedicated cleaning guidance rather than extending corrosion troubleshooting into a full cleaning process.
Surface Rust, Dirt Buildup, and Stainless Steel Staining
Surface rust, dirt buildup, and stainless steel staining can look similar but may have different causes and require different responses. Orange spots may indicate surface rust after moisture exposure, while black residue or debris in gaps may indicate accumulated grime. Discoloration can also reflect stainless steel staining or finish damage, so appearance alone should not determine the treatment.
Surface Rust, Dirt Buildup, and Stainless Steel Staining are easier to assess when the table compares appearance, likely cause, and safe first response. Confirm the condition before treatment because cosmetic surface marks do not necessarily indicate structural corrosion, and not every rust spot can be removed without affecting the finish.
| Appearance | Likely cause | First check | Avoid |
|---|---|---|---|
| Orange spots | Possible surface rust following moisture exposure | Check whether the mark is superficial or accompanied by deeper corrosion | Assuming every orange mark is removable rust |
| Black residue or debris in gaps | Possible dirt buildup and trapped grime | Inspect around links and joints for accumulated debris | Treating buildup as corrosion without inspection |
| Stainless steel staining or discoloration | Possible surface staining or finish damage | Check whether the change is limited to the surface | Forceful polishing before confirming the cause |
When Corrosion Means the Band Should Be Replaced
Corrosion is more likely to mean the band should be replaced when it affects structural strength, retention parts, or areas that remain in regular skin contact. Cosmetic surface corrosion may not require replacement, but pitting, weakened components, or persistent damage can increase replacement-level risk depending on the band’s condition, repair confidence, and the availability of suitable parts.
The checklist below identifies when corrosion may mean the band should be replaced, with the decision depending on visible part weakening, daily wear demands, and repeated water exposure.
- Pitting: Deep pitting that affects structural reliability may justify replacement rather than cosmetic treatment.
- Spreading rust: Corrosion that continues to spread or returns after maintenance may indicate a broader condition than isolated surface marks.
- Weakened links or corroded pins: If weakened links or corroded pins affect retention, replacement may be appropriate when reliable repair is uncertain.
- Clasp-area corrosion: Corrosion around clasp components may require replacement when secure closure cannot be restored reliably.
- Recurring moisture damage or skin-contact concerns: Continuing corrosion, recurring moisture damage, or rough corroded surfaces against the skin may support replacement, particularly for daily wear or frequent water exposure.
When to Stop Wearing, Repair, or Replace the Band
Stop wearing the band when loose retention parts, clasp failure, or corrosion create a meaningful drop risk during normal use. The safest next step depends on part condition, repair confidence, the watch model, and whether suitable replacement parts remain available, because not every damaged band can be repaired reliably.
When to Stop Wearing, Repair, or Replace the Band becomes clearer when drop risk, part condition, and repair confidence are assessed together. The flowchart below organises the safest next step before the watch is worn again.
- Stop wearing: If loose retention parts, clasp failure, or corrosion increase drop risk, stop wearing the watch until it has been inspected.
- Inspect condition: Check for worn, bent, missing, or corroded components and determine whether the damage affects structural reliability.
- Decide repair confidence: Proceed with repair only when the fault is understood and you have the appropriate tools and confidence for the repair.
- Repair or replace: Repair may be suitable when the affected parts remain serviceable. If repeated failures, extensive corrosion, or limited part availability prevent a reliable repair, replacement may be the safer path.
- Verify before wear: Confirm that the clasp locks securely and all retention parts remain stable before wearing the watch again.
If uncertainty remains, repeated failures continue, or the repair threshold exceeds your tool confidence, professional repair is usually the safer option. When reliable repair is no longer practical because of part condition or ongoing corrosion, it may be time to replace a metal watch band.
Drop-Risk Signs That Need Immediate Attention
Drop risk requires immediate attention when the band shows signs that retention may fail during normal wear. Pins backing out, spring bars not seated, clasp popping open, broken safety locks, cracked links, or severe corrosion near load-bearing parts are stronger warning signs than cosmetic marks, although the decision still depends on the band’s condition and the affected components.
The checklist below identifies drop-risk signs needing immediate attention because retention failure matters more than cosmetic discomfort.
- Pins backing out: Visible movement or partial pin separation is a red flag because link retention may be reduced.
- Spring bars not seated: A spring bar that is not fully engaged may allow the band to detach.
- Clasp popping open: A clasp that opens without normal release pressure can indicate unreliable closure and unsafe wear.
- Broken safety locks: Damaged or missing safety locks may reduce secondary retention on clasp designs that use them.
- Cracked links: Cracks in load-bearing links may weaken the band during normal movement.
- Severe corrosion: Corrosion affecting load-bearing parts or retention components may reduce structural reliability; stop wearing the band before further checks if visible weakening is present.
DIY Tool Fixes Versus Jeweler or Watch Repair
DIY tool fixes depend on part access, damage severity, and your confidence using repair tools without affecting retention. A low-risk adjustment may suit link kits, replacement pins, or spring bars when the band and required parts are undamaged and compatible, while damaged clasp parts, corrosion, or uncertain fit usually raise the threshold for professional repair.
DIY Tool Fixes Versus Jeweler or Watch Repair is easier to judge when low-risk adjustments are separated from repairs that affect structural retention. The comparison below shows when a home fix may be reasonable and when a jeweler or watch repairer is usually safer.
| DIY may fit | Jeweler or watch repair is safer |
|---|---|
| Using repair tools or link kits for routine link adjustment when the band, access points, and parts remain undamaged. | Damage involving clasp parts, structural components, or retention points. |
| Installing replacement pins or spring bars when the correct parts are available and the procedure is understood. | Repeated pin or spring bar failures, uncertain compatibility, limited part access, or damaged seating points. |
| Minor maintenance where the result can be checked securely before the watch is worn. | Professional repair is the safer threshold when damage severity, corrosion, or limited confidence makes the outcome uncertain. |
Preventing Repeat Metal Watch Band Problems
Preventing repeat problems starts after the immediate issue has been stabilised and the band is secure for routine use. Continued reliability depends on fit checks, moisture control, cleaning frequency, and the condition of retention parts, with preventive action adjusted when wear, corrosion, or part condition changes.
The checklist below helps reduce repeat metal watch band problems through fit, cleaning, moisture control, and part checks.
- Fit checks: Recheck the fit after any adjustment and during regular wear, because uneven tension may increase stress on links and retention parts.
- Clasp testing: Confirm the clasp closes and locks consistently before wearing the watch.
- Pin inspection: Look for movement, partial pin migration, or loose seating around adjusted links.
- Drying: Dry the band after exposure to sweat or moisture, especially around joints and the clasp where moisture may remain.
- Cleaning frequency: Clean often enough to limit buildup, with frequency based on wear conditions and moisture exposure.
- Avoid forced adjustments: Do not force links, pins, or clasp components when alignment or compatibility is uncertain.
- Replace worn parts: Replace worn parts before failure when visible wear or unreliable retention continues.
If repeated failures continue despite routine checks, the cause may be poor compatibility, worn parts, or damage beyond routine prevention. In those situations, replacement or professional assessment may be the more appropriate decision.